I was doing a little Fall cleaning over the weekend and I decided to take a peek inside the water tank. Glad I did.....I found a layer of scum on the bottom. Everything I read said to have a solid colored tank to keep light out and inhibit algae growth but I though since my tank was in the shed..out of direct sunlight that I would be OK. Well, I was wrong. Cleaning the tank was not a big deal....a shop vac, scrub brush and a bit of bleach did the trick. the episode did bring to light some design flaws in my system...
1. I need a drain from the main tank to the outside. I disconnected my supply line into the house to drain the tank but I need to plumb in a permanent way to drain the main tank for cleaning. A simple Y fitting and a length of hose with a shut-off will work. That will be the next project...
2. I need some form of pressurized water when the tank is empty. This time I used a super soaker but I need a better solution.
3. Even though I don't drink the water I still need to treat it. A little bleach would have gon a long way.
4. I need a better pre-filter system. There was a little more debris in the tank than I was expecting....likely from some very heavy rains we had. A tighter screen, angled away from the house would probably help a lot.
All in all the system is working great. I will need to keep a better eye on maintenance and keeping the inside clean though...especially when I put my new roof on and start drinking the water..
Tuesday, October 28, 2014
Thursday, October 2, 2014
Home Improvement......
I have been pretty lazy this summer, focusing more on having fun than homesteading. The result is that the tiny house is getting a little wild. The bushes have grown up around the property making the house seem very set in and frankly, I kind of like it. Changes are coming though. I am on the process of trying to purchase 1 acre in town and move the house which means I have a bunch of work to do. Ideally this will happen before the cold sets in so I have started organizing my tasks in order to be ready as quickly as possible.
The property I am trying to buy is a little different that what I am working now. There were 2 mobile homes there in the past and they are on city water (and septic and electricity). While I would prefer to remain off grid I may have to hook up to utilities to get a C/O. I am not sure but it should not be too hard to do if it comes down to it. The big X factor is the composting toilet. I need to get approval from the county to use one and they are still not very common out here. Fingers crossed.
The house has weathered pretty well this summer although I really need to re-do the siding. I was hoping to do it all at once but I think it may come down to doing a side as money comes in. Work has been slow and funds are definitely tight. I also rented a studio space which is eating into the house money. That will have to go away If I buy the land anyway.
Well not much to tell...I wish I had more.
Wednesday, June 11, 2014
Rain Collection Update!!!!
....so last night I received a massive downpour at the house. I got 1/2" of rain in a very short period of time and really put the screws to the rain harvesting system. My inlet from the gutters is 2" PVC and my overflow outlet to the outside barrels is 1" pipe. The rain came so heavy last night that the overflow could not keep up with the rain coming off the roof. Luckily I was there to divert the gutter water away from the system, keeping the main storage tank from overflowing but If I had not been home it would have been a huge mess in the shed. Today I plan to go to Lowe's and get a 2" bulkhead fitting and the rest of the bits to make my overflow the same size as my inlet.....or maybe I could arrest the water coming into the pipe to slow it down. A 1" reducer after the 1st flush diverter may work.....I need to do some thinking.
The good news is that 1/2" inch of heavy rain topped off my cistern and would have easily filled my outside barrels. With 70 gallons outside to water the garden I should be able to last 8-10 days with no rain (more like 8). I may tie 1 more rain barrel in, giving me an outside capacity of 100 gallons....that would be nice.
So the Moral of the story is that the overflow pipe needs to be the same diameter as the inlet pipe on your rain system or a very heavy rain will overflow the cistern. That's not a big deal if your cistern is outside but mine is in the shed/bathroom. Not Good.
Hope this helps.....
 |
| The problem is the small pipe going into the barrel on the right. This comes out of my cistern as overflow. Water was pouring in so fast last night that the smaller diameter pipe was not letting enough into the overflow to keep up.. |
The good news is that 1/2" inch of heavy rain topped off my cistern and would have easily filled my outside barrels. With 70 gallons outside to water the garden I should be able to last 8-10 days with no rain (more like 8). I may tie 1 more rain barrel in, giving me an outside capacity of 100 gallons....that would be nice.
So the Moral of the story is that the overflow pipe needs to be the same diameter as the inlet pipe on your rain system or a very heavy rain will overflow the cistern. That's not a big deal if your cistern is outside but mine is in the shed/bathroom. Not Good.
Hope this helps.....
Tuesday, June 10, 2014
The Progression from Changing Room to Tiny House...and how it all started.
I have been thinking a lot lately of all the work that I have not finished on the house. There is a ton. I still have not installed the ceiling, the new roof or put new siding up. The outside trim is not finished and the inside is till mostly raw wood nailed into the shape of an interior. I was getting bummed out and then I looked at all the things that I had accomplished. This building started out as a plywood shell missing 1 wall. There was floor rot, wasp nests, mud daubers, and exposed wall joists. There was no insulation, a chipboard floor and it smelled suspiciously of wet feet. 3 years later I have a house with hardwood floors, tons of light, overlooking a 10 mile view with the sound of a waterfall hidden behind the Locusts. When I turn on the shower, hot water comes out and when I walk in the front door there are switches on the wall for my living room lights and ceiling fan. When it rains my cistern fills and the sun keeps my battery bank topped off even in the winter. There is a huge garden in the yard and a chicken coop with a few hens who lay more eggs than I care to eat. There is a composting toilet that works great and a small shed to store my camping gear. There is a couch that folds out into a bed and a table that acts as a counter top but does double duty as a dining table when I pull it out and flip up the drop leaf. There is a small wood stove that heats the house perfectly and a wood pile that seems to last forever. There is honeysuckle and blackberries all over the place a fire pit made out of an old washing machine (Thanks Chris and Meagan). So yes, the house gets super cluttered and there are still some major projects to do but really, when you think about it, more has been done than needs to be done....that feels pretty good. Here is a timeline.....
First I obsessed over tiny houses and tiny house woodstoves until I found the perfect stove for a fraction of the cost of a new one...on Craigslist!

2. Chris and Jess insulated and installed a window while I was away (Thanks!)
3. Replaced window
4. Added sliding glass door, installed floors and put wall panels up


6. Moved the house to the acreage and Installed the loft and the stair/shelf combo
7. Bought and installed the solar system
8. Built the first generation of the kitchen
9. Installed the shower, plumbed water from the outside and built garden beds


11. Bought the cistern and built the addition on the end


13. Added light switches!!!!! and a second overflow tank.
The neat thing is that there will always be something to do..I still have a bunch. Here's the list in no certain order.....
First I obsessed over tiny houses and tiny house woodstoves until I found the perfect stove for a fraction of the cost of a new one...on Craigslist!
YEAR 1
1. Acquired the house from the Hamptons, built the transom windows and closed in the open end2. Chris and Jess insulated and installed a window while I was away (Thanks!)
3. Replaced window
4. Added sliding glass door, installed floors and put wall panels up
YEAR 2
5. Stalled....Lived in my Van on the acreage at Leah's6. Moved the house to the acreage and Installed the loft and the stair/shelf combo
7. Bought and installed the solar system
8. Built the first generation of the kitchen
9. Installed the shower, plumbed water from the outside and built garden beds
YEAR 3
10. Rebuilt the kitchen, adding a slide out for the fridge11. Bought the cistern and built the addition on the end
YEAR NOW...
12. Added gutters, 1st flush diverter and water overflow tank13. Added light switches!!!!! and a second overflow tank.
The neat thing is that there will always be something to do..I still have a bunch. Here's the list in no certain order.....
- Install the ceiling
- Install metal roof
- Plumb the sink
- Rebuild the deck
- Better shower drain
- Buy a proper TV
- Add batteries and a bigger inverter
- Outdoor pizza oven
- Wood fired hot tub and path to the creek
- Grey water filter
- New Siding
Solar System Review 400w Renogy Solar Panel Starter Kit
Prices on solar panels have dropped drastically in the last few years and when I was searching for a system to power my tiny house I was surprised at what a value Chinese panels had become. I knew that I wanted to buy a complete kit since I was no expert and I found the Renogy brand kits available for what seemed like a steal....so I bought one. These kits are Chinese made (I assume) and come complete with wiring, hookup connections, charge controller and panels as well as mounting hardware. They came well packaged and arrived very quickly from Baton Rouge (Renogy ships from Louisiana and California). The system was almost self explanatory but having some idea of how to wire 12v surely helped. The instructions were translated from Chinese and were so-so but all in all the system went together pretty easily (after a phone call to Renogy support who were very helpful). The kit comes with almost everything you need....almost. You will have to buy some heavy duty stranded wire to go between the charge controller and your battery bank. I ordered mine from the internet and paid too much...get it locally.
The system went on the roof pretty easily, putting the mounting brackets on the panels while on the ground and then getting them on the roof and screwing them down. The connectors went together easily and the whole project took an afternoon. The panels (4) are each rated at 100w giving me a peak 400w output in direct sun. My battery bank is very small, consisting of 2 GC-6 6v Golf cart batteries which I bought at Advance Autoparts. I paid too much for the batteries. I was in a hurry and should have gone to Sam's Club. I would have saved almost 30$ each. The batteries I bought provide 110 amp hours (not a lot)but since my electricity use is so small I have never really taxed the system. Even with snowy, cloudy, low sun winter days my little battery meter always said the bank was full of juice. I really don't use a lot of power though....here is a list.
One valuable lesson is that it is easier to cut down on your electricity consumption than it is to try to scale your system to your needs. Powering a whole house or even 1 electric heater would be impossible with a system sized like mine. Living in a tiny house makes it easier but converting a normal sized house to be off grid would cost a fortune....much more than a monthly electric bill. I chose off grid power for two reasons..one, I knew my house would never be up to code as far as city ordinances and two, I knew that I wanted to live in a place that power wasn't readily available. All in all my system seems sized perfectly for my small house. The only drawback is the lack of 110v to run my studio equipment. I am planning to upgrade my inverter to accommodate my power needs for recording music but that is a double edged sword. I will also need to upgrade the battery bank. I really don't have room to set up music gear so it is not a priority but that is the only thing lacking for me as far as living small and off grid.
Hope this helps some folks.
- Edgestar 12v refrigerator
- 3 12v L.E.D lamps
- 12v ceiling fan
- 12v small box fan
- 12v audio amp
- 12v portable DVD player
- cell phone charger
- 12v hood fan/light over the stove
One valuable lesson is that it is easier to cut down on your electricity consumption than it is to try to scale your system to your needs. Powering a whole house or even 1 electric heater would be impossible with a system sized like mine. Living in a tiny house makes it easier but converting a normal sized house to be off grid would cost a fortune....much more than a monthly electric bill. I chose off grid power for two reasons..one, I knew my house would never be up to code as far as city ordinances and two, I knew that I wanted to live in a place that power wasn't readily available. All in all my system seems sized perfectly for my small house. The only drawback is the lack of 110v to run my studio equipment. I am planning to upgrade my inverter to accommodate my power needs for recording music but that is a double edged sword. I will also need to upgrade the battery bank. I really don't have room to set up music gear so it is not a priority but that is the only thing lacking for me as far as living small and off grid.
Hope this helps some folks.
Tuesday, June 3, 2014
Rain Harvesting
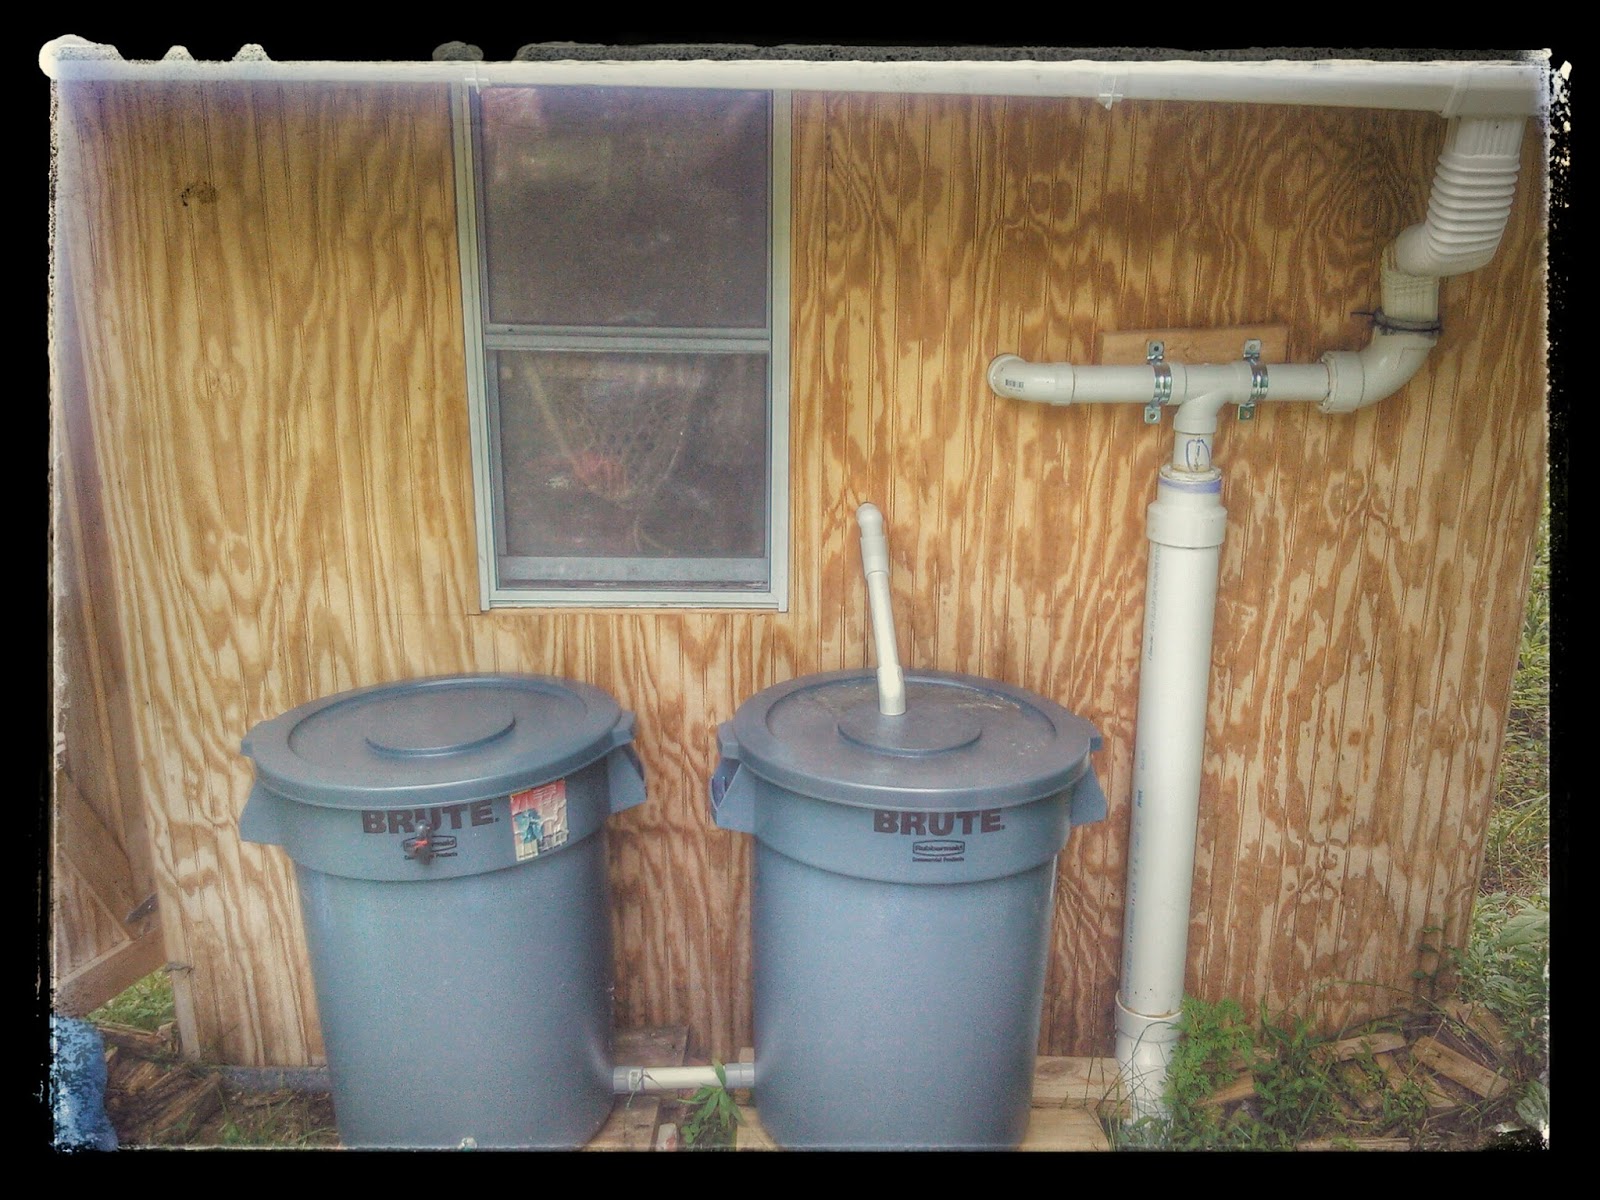
A couple of months ago I installed a rain collection system on the tiny house. It started with gutters which fed into a "first flush diverter" and then into my 125 gallon cistern inside the shed. The overflow feeds back out of the house into a 35 gallon "BRUTE" brand rubbermaid trash can. The system is great, a good heavy rain easily filling my tanks. I am going to add another brute can tied into the supply outside as I am going to need much more water since the garden is so much bigger this year.
The harvesting system is made up of just a few major parts...
Collection Area
This is simply the roof. My roof is made of asphalt shingles and while this is not good for potable water, it seems to be alright for wash water. I do have plans for a metal roof (Galvalume) but time and finances have dictated that I use what I have for now. There are numerous perceived problems for using an asphalt shingle roof for rain harvesting and I have read conflicting reports pertaining to the safety of water collected from such roofs. Some studies say that the water is no more polluted than that of a wood shingle or metal roof but my gut tells me that I don't want to drink the water from up there so I don't. In any case, all water collected from a roof harvesting system needs to be filtered before drinking..no matter the material.
Gutter System
The gutter system that I installed on my house is very simple. I bought the gutter materiel at Lowes and it simply clicks together. I spent around 50$ and had a few odds and ends left over which I saved for my next project. I have a shed roof with about 1/2 of the length being taken up by an awning. I installed a simple water break over the awning section to mover water down into the gutter which wraps around the side of the house (the shed area) and into a downspout which pours into the first part of my "Roof washer". The inlet here is just a large diameter PVC coupling with a fine mesh screen zip tied to the top of it. An angled setup that automatically rinses debris would be better but......well, hindsight.
1st Flush Diverter
OK. The water coming off your roof is going to be nasty. Bird poop, dead bugs, grit, pollen....all of these things are going to end up in your gutters when it rains and a First Flush Diverter or Roof Washer will help isolate all of these nasties before they hit your cistern. The diverter is simple to make. It is simply a PVC "T" with the top arms going from your gutter system to your cistern or holding tank. The bottom of the T is connected to a reducer fitting (enlarger actually, you want a larger diameter tube at the bottom) and a piece of PVC pipe to match. At the very bottom a matching 90 degree fitting and a threaded cleanout complete the shell. The magic happens inside. In the lower leg (the vertical PVC pipe) you install a rubber ball. As rain comes off the roof it pours into the vertical pipe first and as the water level rises so does the rubber ball. When the vertical pipe is full the rubber ball should be pressing against the top (the backwards reducer) effectively capping the lower pipe and allowing water to freely flow to the outlet which in turn enters your collection tank. There are numerous pictures on the net and this is a really simple project. Here is a list of items that you will need to make one exactly like mine..
You will need to figure out how many gallons you need to flush for the system to work properly as well. My roof is very small, about 200 square feet so I need to only divert the first few gallons of water (2.8 gallons I think). If you have a large roof you may need a bigger system. One option would be to add another washer in series....when the first on fills and lets water pass and the second one starts to work only allowing water to pass after both are filled. There are numerous articles online about how much water to divert but a very safe rule of thumb is 1 gallon per 100 square feet (this is actually overkill a bit). Below is a link to a calculator to figure out the volume of a cylinder. You can use this to determine how much water the vertical PVC pipe will hold....
http://www.online-calculators.co.uk/volumetric/cylindervolume.php
Don't forget to drill a pinhole in the bottom of the vertical pipe so water will slowly drain out, resetting the system between rain events...
Water Storage
Storing enough water is very important. Obviously. My cistern is a 125 gallon water tank located in a shed on the side of my house. The water enters from a 2" PVC pipe at the top (sealed with silicone) and there is a 1" outlet on the side, about 2" from the top (so really my tank holds about a hundred gallons). This outlet is plumbed back outside to two 35 gallon Rubbermaid brand "Brute" garbage cans which are tied together. These cans also have a small outlet near the top for overflow. I think that using a smaller (1") pipe as an overflow on the main tank was a design flaw but so far it has not rained so hard/much that the overflow could not keep up. It will be interesting to see what happens when I get that much rain though.....maybe have to re-do the overflow. Well, so far so good. A good rain fills the tank and a great rain fills the outside cisterns too. One thing to remember regarding your storage tank. Any light will cause algae growth so an opaque tank is better. My tank is not opaque but I have it housed inside a shed, in darkness. A few drops of bleach will kill algae but keeping the tank out of the sun works too....with no harsh chemicals. I live year round in my tiny cabin so another reason for the tank being inside is to keep it from freezing. This winter I plan to add a small vent and blower and heat the shed as my tank did freeze a couple of times last winter.
I hope this post helps. Collecting water is a neat way to add a little "green" to your house without spending a bunch of green. As water sources dry up and/or get more polluted this may become a necessity. It's nice to be ahead of the curve.
You may notice the Amazon links that are going to start appearing on my pages. These are affiliate links and if you click through them to go shop on Amazon I make a little scratch. As I get more in depth in the blog I am going to try to monetize it a bit (to buy stuff to review...I don't have sponsors) and Amazon is an easy way to go. Your support is appreciated!!
 |
| The system from R-L : Down Spout, 1st Flush Diverter piped into the cistern in the shed, overflow from inside out to two 35 gallon Brute garbage cans tied together w/ 1" PVC at the bottom. Not shown is the 125 gallon cistern inside and the spigot at the bottom of the barrel on the left. Total system capacity is almost 200 gallons. |
The harvesting system is made up of just a few major parts...
- Collection Area
- Gutter System
- 1st Flush Diverter (Roof Washer)
- Holding Tanks
Collection Area
This is simply the roof. My roof is made of asphalt shingles and while this is not good for potable water, it seems to be alright for wash water. I do have plans for a metal roof (Galvalume) but time and finances have dictated that I use what I have for now. There are numerous perceived problems for using an asphalt shingle roof for rain harvesting and I have read conflicting reports pertaining to the safety of water collected from such roofs. Some studies say that the water is no more polluted than that of a wood shingle or metal roof but my gut tells me that I don't want to drink the water from up there so I don't. In any case, all water collected from a roof harvesting system needs to be filtered before drinking..no matter the material.
Gutter System
The gutter system that I installed on my house is very simple. I bought the gutter materiel at Lowes and it simply clicks together. I spent around 50$ and had a few odds and ends left over which I saved for my next project. I have a shed roof with about 1/2 of the length being taken up by an awning. I installed a simple water break over the awning section to mover water down into the gutter which wraps around the side of the house (the shed area) and into a downspout which pours into the first part of my "Roof washer". The inlet here is just a large diameter PVC coupling with a fine mesh screen zip tied to the top of it. An angled setup that automatically rinses debris would be better but......well, hindsight.
1st Flush Diverter
OK. The water coming off your roof is going to be nasty. Bird poop, dead bugs, grit, pollen....all of these things are going to end up in your gutters when it rains and a First Flush Diverter or Roof Washer will help isolate all of these nasties before they hit your cistern. The diverter is simple to make. It is simply a PVC "T" with the top arms going from your gutter system to your cistern or holding tank. The bottom of the T is connected to a reducer fitting (enlarger actually, you want a larger diameter tube at the bottom) and a piece of PVC pipe to match. At the very bottom a matching 90 degree fitting and a threaded cleanout complete the shell. The magic happens inside. In the lower leg (the vertical PVC pipe) you install a rubber ball. As rain comes off the roof it pours into the vertical pipe first and as the water level rises so does the rubber ball. When the vertical pipe is full the rubber ball should be pressing against the top (the backwards reducer) effectively capping the lower pipe and allowing water to freely flow to the outlet which in turn enters your collection tank. There are numerous pictures on the net and this is a really simple project. Here is a list of items that you will need to make one exactly like mine..
- 2" PVC Pipe
- 2" PVC 90 degree (for the inlet from the gutters)
- 2" PVC "T" Fitting
- 2" to 3" (or 4") Reducer
- 3" (or 4") PVC Pipe
- 3" (or 4") 90 degree PVC Bend
- 3" (or 4") Threaded Cleanout
- PVC Purple Primer
- PVC Cement
- Hacksaw
- Fiberglass Screen (for a sediment filter)
- Large ZIP Ties (to attach sediment filter to the PVC 90 Degree)
- Rubber Ball
I will add some photo's below to try to help explain how to put this together but it's pretty simple and should cost no more than 50-60 $. Or you could buy a pre-made one here.....
You will need to figure out how many gallons you need to flush for the system to work properly as well. My roof is very small, about 200 square feet so I need to only divert the first few gallons of water (2.8 gallons I think). If you have a large roof you may need a bigger system. One option would be to add another washer in series....when the first on fills and lets water pass and the second one starts to work only allowing water to pass after both are filled. There are numerous articles online about how much water to divert but a very safe rule of thumb is 1 gallon per 100 square feet (this is actually overkill a bit). Below is a link to a calculator to figure out the volume of a cylinder. You can use this to determine how much water the vertical PVC pipe will hold....
http://www.online-calculators.co.uk/volumetric/cylindervolume.php
Don't forget to drill a pinhole in the bottom of the vertical pipe so water will slowly drain out, resetting the system between rain events...
 |
| Simple Sketch of my first flush diverter...don't forget the rubber ball inside and the pinhole at the bottom!! |
Water Storage
Storing enough water is very important. Obviously. My cistern is a 125 gallon water tank located in a shed on the side of my house. The water enters from a 2" PVC pipe at the top (sealed with silicone) and there is a 1" outlet on the side, about 2" from the top (so really my tank holds about a hundred gallons). This outlet is plumbed back outside to two 35 gallon Rubbermaid brand "Brute" garbage cans which are tied together. These cans also have a small outlet near the top for overflow. I think that using a smaller (1") pipe as an overflow on the main tank was a design flaw but so far it has not rained so hard/much that the overflow could not keep up. It will be interesting to see what happens when I get that much rain though.....maybe have to re-do the overflow. Well, so far so good. A good rain fills the tank and a great rain fills the outside cisterns too. One thing to remember regarding your storage tank. Any light will cause algae growth so an opaque tank is better. My tank is not opaque but I have it housed inside a shed, in darkness. A few drops of bleach will kill algae but keeping the tank out of the sun works too....with no harsh chemicals. I live year round in my tiny cabin so another reason for the tank being inside is to keep it from freezing. This winter I plan to add a small vent and blower and heat the shed as my tank did freeze a couple of times last winter.
I hope this post helps. Collecting water is a neat way to add a little "green" to your house without spending a bunch of green. As water sources dry up and/or get more polluted this may become a necessity. It's nice to be ahead of the curve.
You may notice the Amazon links that are going to start appearing on my pages. These are affiliate links and if you click through them to go shop on Amazon I make a little scratch. As I get more in depth in the blog I am going to try to monetize it a bit (to buy stuff to review...I don't have sponsors) and Amazon is an easy way to go. Your support is appreciated!!
Wednesday, April 23, 2014
Been busy!!
....It has been a busy time since my last post. I have installed the water collection system and am now enjoying 95 gallons of fresh water for every inch of rain that lands on my little roof. The system is very simple consisting of a gutter system that feeds into a first flush diverter....basically a "T" of PVC with a tube beneath it. The tube is capped at the bottom with a clean out and inside there is a rubber ball. When the rain starts the water is funneled into the diverter and the first 2.5 gallons fills up the vertical tube. Inside the rubber ball rises until it hits the top and closes off the vertical tube allowing the remaining rainwater to continue on to my cistern. The "roof washer" cost about 50$ to build and so far has worked great. I am still not getting potable water due to my roof materiel but I am getting enough for washing and watering the garden....
.....which went in this week. I have doubled the size of my beds, creating three 4x4 beds out of 2 recycled banquettes from a bar in town. I chopped the backs off of them and placed them next to each other with a 4' gap in between. I then tied them together with some scrap lumber and stapled landscape fabric to the bottoms. Inside I have a layer of cardboard and a layer of straw. The beds are filled with rich soil that I bought from the local yard (96$ for 1.5 cubic yards...ouch). It is a nice blend, dark and rich and I have high hopes for the crop this year.
I have been picking away at the inside of the house too. The kitchen has been re-done. I added some nice shelves (the back of a banquette...waste not!) and I re-did the shower enclosure which looks much better but is much more of a pain in the butt. Going back to the drawing board on that one. I have added some trim around the sliding door and will finish trimming out soon.
...The ceiling is still not in. That's all I want to say about that. It's a mix of lazyness and the extreme PITA factor. it will get done soon. I hope.
Subscribe to:
Posts (Atom)